Unleashing the Power of Your Device: How to Test an LCAP4KF DB Link Capacitor Like a Pro
Introduction
If you’ve been around electronic devices long enough, you know that capacitors play a crucial role in keeping everything powered up and running smoothly. However, when it comes to specialized components like the LCAP4KF DB link capacitor, knowing how to test it can make all the difference between a smoothly running system and one plagued with hiccups. Capacitors of this type are unique, designed for particular devices, and demand a slightly different testing process than your typical capacitor.
Testing the LCAP4KF DB link capacitor might sound daunting, but don’t sweat it! This guide breaks down everything you need to know, from essential tools to practical steps and troubleshooting tips. So, let’s roll up our sleeves and dive right in to learn how to test a LCAP4KF DB link capacitor.
Table of Contents
- Why Testing Capacitors Matters
- Tools You’ll Need
- Understanding LCAP4KF DB Link Capacitors
- Pre-Testing Safety Precautions
- Step-by-Step Guide: How to Test a LCAP4KF DB Link Capacitor
- Common Issues and Troubleshooting Tips
- FAQs
- Wrapping It Up
Why Testing Capacitors Matters
Testing your capacitor isn’t just a good idea—it’s a must. Here’s why:
- Ensures Optimal Device Performance: A faulty capacitor could spell disaster for your device. Ensuring it’s working correctly means you’re helping prevent potential breakdowns.
- Prevents Circuit Overloads: Capacitors are all about balancing and regulating current. Testing ensures they don’t cause any overloads or failures.
- Extends the Device’s Lifespan: Regular testing and maintenance of components, especially capacitors, help devices last longer.
Tools You’ll Need
Before diving into the testing process, let’s make sure you’ve got the right tools. For testing an LCAP4KF DB link capacitor, these essentials are key:
- Multimeter: This is the go-to tool for any capacitor testing.
- Screwdriver: For accessing the capacitor inside your device, if necessary.
- Insulated Gloves: Safety first! Working with electrical components demands precaution.
- Safety Goggles: Protect those peepers—always wear eye protection when handling capacitors.
Understanding LCAP4KF DB Link Capacitors
So, what makes the LCAP4KF DB link capacitor so special?
The LCAP4KF DB link capacitor is typically found in high-power electronic setups. It’s built to handle intense power loads while maintaining stable voltage levels across your system. Unlike simpler capacitors, the LCAP4KF DB link capacitor usually has a higher capacitance and a more complex structure. When it fails, your system’s performance takes a nosedive, which is why regular testing is vital.
Pre-Testing Safety Precautions
You don’t want to jump in without ensuring your safety, do you? Here are some must-do safety measures:
- Power Off the Device: Make sure the power is completely off, and unplug the device to avoid any electric shocks.
- Discharge the Capacitor: Capacitors store energy, even when unplugged. Use a resistor or a screwdriver with an insulated handle to safely discharge it.
- Check for Visible Damage: Any signs of bulging, leakage, or burning? These indicate serious issues, and you might need a replacement instead of a test.
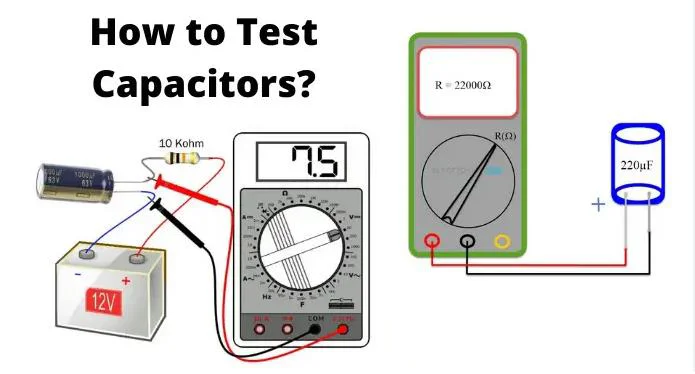
Step-by-Step Guide: How to Test a LCAP4KF DB Link Capacitor
Ready to get started? Here’s a step-by-step guide to testing your LCAP4KF DB link capacitor like a pro:
1. Locate the Capacitor
- First off, locate the LCAP4KF DB link capacitor within your device. It might be labeled or surrounded by other components, so take care when accessing it.
2. Set Up Your Multimeter
- Turn on your multimeter and set it to the capacitance measurement mode (often labeled with the symbol “F”).
- If your multimeter doesn’t have this function, switch it to the resistance setting.
3. Test with the Multimeter
- For Capacitance Measurement: Place the multimeter probes on each terminal of the capacitor. If the reading aligns with the capacitor’s rated capacitance (usually listed on the component), your capacitor is in good shape. A drastic deviation indicates a problem.
- For Resistance Measurement: Touch the probes to each terminal, then switch the probes to the opposite terminals. Watch for a resistance reading that initially rises and then steadies or goes infinite. If the reading is static or very low, you might be dealing with a shorted capacitor.
4. Observe the Readings
- For a properly working capacitor, the readings will either match or come close to the rated capacitance. Any significant deviation means the capacitor is likely faulty.
- If the resistance measurement doesn’t change, it’s likely that the capacitor is damaged or has failed.
5. Inspect Physically and Note Any Abnormalities
- Sometimes, testing isn’t enough. Look for signs of wear, like bulging or leaks, as these are indicators that the capacitor might soon fail.
Common Issues and Troubleshooting Tips
Not all capacitors go down without a fight! Here are some issues you might encounter when testing your LCAP4KF DB link capacitor, along with quick fixes:
- Issue: No Reading on Multimeter
- Solution: Double-check your connections and settings on the multimeter. Make sure you’re in the right measurement mode.
- Issue: Low Capacitance or Resistance Reading
- Solution: This might mean your capacitor is partially damaged. In this case, replacing the capacitor is often more cost-effective than repair.
- Issue: Device Functions Irregularly Even with a Good Reading
- Solution: Test the capacitor again to be sure. Sometimes, capacitors can intermittently fail. Also, check surrounding components; the issue might not be with the capacitor at all.
FAQs
1. Can I test an LCAP4KF DB link capacitor without a multimeter?
Technically, yes, but it’s not recommended. Multimeters are the easiest and most reliable way to get accurate readings. You could try using an oscilloscope, but that’s generally more complicated.
2. How often should I test my capacitor?
If your device is used frequently or relies heavily on stable power flow, test it at least once a year. However, if it’s part of an industrial setup, quarterly checks are a good practice.
3. My capacitor reads close to zero—what now?
A zero or near-zero reading indicates a short circuit within the capacitor. It’s time to replace it.
4. Are there any symptoms of a failing capacitor?
Yes! Some signs include:
- Device overheating
- Frequent resets or shutdowns
- Strange buzzing or humming sounds
5. Is replacing a capacitor a DIY job?
If you’re comfortable working with electronics, you can definitely replace a capacitor on your own. Just make sure you match the specs exactly and follow safety protocols.
Wrapping It Up
Learning how to test an LCAP4KF DB link capacitor isn’t just a skill—it’s a way to keep your devices in tip-top shape and potentially save yourself from costly repairs. With the right tools, a bit of patience, and these steps at your disposal, you’ll be well-equipped to troubleshoot, test, and maintain your capacitor like a pro.
By following this guide, you can confidently take matters into your own hands and get a clear idea of your capacitor’s health. So, next time you’re dealing with an LCAP4KF DB link capacitor that’s acting up, remember—you’ve got the know-how to keep it running smoothly!